Innosilicon & Aladdin T2T / T3 / L2 Portable Test Fixture — User Manual & Repair Guide
The Innosilicon Aladdin portable test fixture is a self-contained, computer-free diagnostic tool for ASIC repair benches running the full Innosilicon catalogue — T1, T2TS, T2TH, T2TZ, T3, A4+, A6, A6+, A9 on the Bitcoin SHA-256 side, and Aladdin L1, L2HF, L2HU, L2SU, L2HL on the Litecoin/Scrypt side. The same fixture tests both hashboards and digital power supplies from a single twelve-button operator panel, with a built-in LED display reporting chain status, chip count, average voltage, average temperature, and PSU output rails. No host PC required for the quick-test mode; full process testing unlocks via USB serial at 115200 baud for deeper diagnostics.
This 2026 update consolidates the bench-operator workflow into a single reference: interface map, the two PSU test paths (quick vs depth), the two hashboard test paths (quick connect vs full debug mode), the LED display code interpretation, the supporting equipment list, and the field decision points for when the fixture earns its bench space vs when to escalate to a multi-brand tester. Pair this manual with the companion Innosilicon G1286 PSU Repair Guide and G1240 PSU Repair Guide for the chip-level repair workflow on the PSU side once the fixture flags a failure.
What the Fixture Diagnoses (and What It Doesn't)
The fixture handles two subsystem tests, each in two modes:
- Hashboard test — Quick Connection mode: chain communication check, chip count readout, average chip voltage, average chip temperature, pass/fail verdict. Runs without fan power; produces minimal heat. Suitable for go/no-go triage on incoming pulled boards.
- Hashboard test — Full Process / Debug mode: parameterised hashing test with selectable startup voltage (12-16V via VID gear 0-31), selectable working PLL frequency (120-1400 MHz), and automatic five-step voltage sweep with chip-voltage observation. Requires fan power + cooling base because the board generates real heat during the test. Suitable for root-cause analysis on intermittent failures and post-repair verification.
- Digital PSU test — Quick mode: 8-second power-on test reporting communication OK/fail (DP OK / DP NG), output voltage in centi-volts (e.g. "DP OUT= 1565" = 15.65V).
- Digital PSU test — Depth mode: vendor identifier (GP = Gaosbao / AR = Anrui / QB = Qianben), firmware version readout, programmable output voltage gear 0-31 with manual UP/DOWN adjustment, measured output voltage and output current, ON/OFF state, communication error counter.
What this fixture is NOT: a chip-level repair tool, a BGA rework station, or a multi-brand tester. It does not test Antminer, Whatsminer, Avalon, Iceriver or Goldshell hashboards/PSUs — for those, use the dedicated brand fixtures or a multi-brand tool like the K8pro ASIC Multi-Brand Hashboard / PSU Tester. Within the Innosilicon/Aladdin envelope it is a "fault locator" — it tells you the board or PSU is bad, identifies which subsystem, and gives enough detail (chip count drop, voltage out-of-range, temperature anomaly) to direct the next step of the repair, but the chip-level rework happens on a separate station.
This fixture is the hero product — see the Innosilicon Aladdin T2T / T3 / L2 Test Fixture stocked from our Shenzhen warehouse, with the T1-only Aladdin Test Fixture (A15 V1.0) available as a single-model alternative for benches running predominantly T1 work.
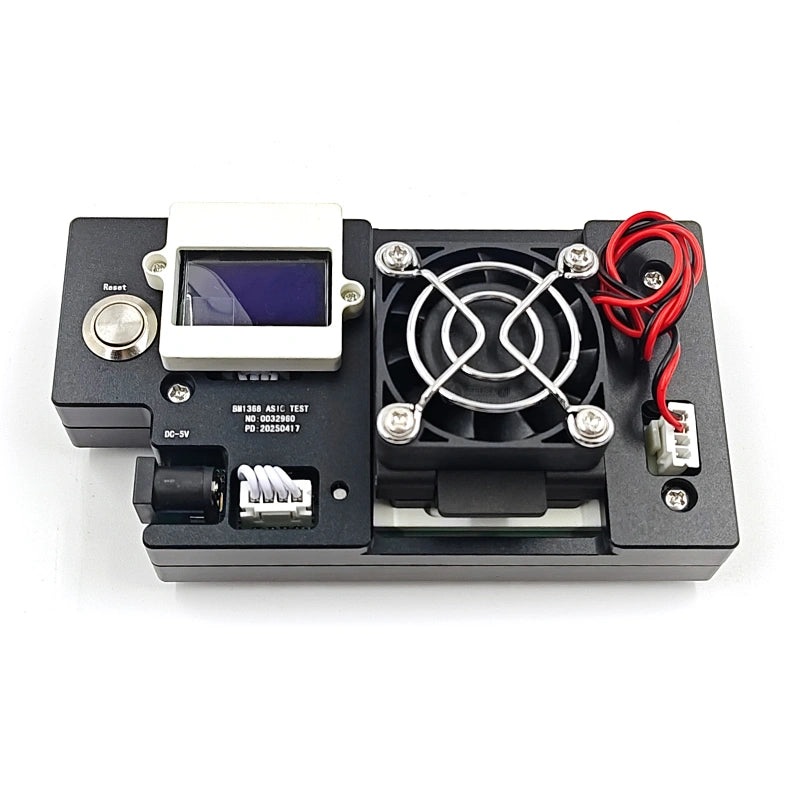
Interface Map — The Twelve Operator Points
The fixture exposes a single front panel with twelve operator points. Reading them in plug-in order:
| # | Operator Point | Function |
|---|---|---|
| 1 | Hash board interface | Connects to the hashboard under test (Innosilicon flat-flex / data harness) |
| 2 | 4-pin power supply & power communication interface | Connects to the digital PSU's 4-pin signal/comm cable for both PSU test modes |
| 3 | 6-pin fan power supply interface | Powers the fixture itself from a fan rail (used on T1/L1 hash board tests in conjunction with point 4) |
| 4 | Mainboard spare power jumper | For T1/L1: short the jumper after powering from point 3. For T2-series and L2-series: leave disconnected. |
| 5 | 1×4-pin fan drive interface | Drives one cooling fan during full-process hash test |
| 6 | 2×4-pin or 6-pin fan drive ports | Drives additional cooling fans during full-process hash test (paired with the cooling base) |
| 7 | Reset button | Re-runs the current test after the display shows "Press RESET Again!" |
| 8 | USB communication interface | Connects to PC for serial output at 115200 baud — required only for Debug Mode and detailed log capture |
| 9 | LED display screen | Shows the four-line brief test information (chain status, chips, voltage, temp, pass/fail) |
| 10 | DOWN function button | Decreases voltage gear in PSU Depth mode; mode selector when held during power-on (enters PSU Depth mode) |
| 11 | UP function button | Increases voltage gear in PSU Depth mode; mode selector when held during power-on (paired with DOWN to enter Depth mode) |
| 12 | Debug mode function button | Held during power-on (with USB connected) to enter full-process hash test mode (Debug Mode) |
Digital PSU Test — Step-by-Step
Mode 1 — Quick Test (8-second go/no-go)
- Plug the digital PSU's 4-pin communication cable into interface 2 of the fixture.
- Turn on the digital PSU's main power switch.
- Wait approximately 8 seconds.
- Read the LED display.
LED display interpretation:
| Display string | Meaning |
|---|---|
| "Test Start!!" | Test sequence has begun |
| "DP OK!" | Communication with the PSU is normal |
| "DP NG!" | Communication failed — PSU has internal supervisor or I²C-bus fault |
| "DP OUT= 1565-" | Output voltage 15.65V (1565 = centi-volts × 100) |
| "DP OUT= 0-" | No output — main switch off, protection tripped, or output stage failed |
| "Chain Break!! E0:1-" | Reports hashboard chain status (ignore during PSU-only test) |
| "Press RESET Again!" | Test cycle ended — press button 7 to repeat |
"DP NG!" combined with "DP OUT= 0-" indicates the PSU's primary side is alive enough to enumerate but the secondary is dead — most often a sync-rectification MOSFET failure or output bulk-cap short. "DP OK!" combined with "DP OUT= 0-" indicates the comm processor is alive but the main rail isn't lifting — typically PWM controller failure, LLC primary MOSFET failure, or PFC bulk voltage out of range. Cross-reference with the companion G1286 PSU Repair Guide or G1240 PSU Repair Guide for chip-level fault location.
Mode 2 — Depth Test (programmable voltage sweep)
Used when the quick test passes but you suspect marginal regulation, slow start-up, or out-of-tolerance ripple. Entry method:
- Before powering on the fixture, hold both UP (button 11) and DOWN (button 10).
- Power on the fixture while keeping both buttons held.
- Release once the LED display indicates Depth Mode is active.
- Use the MODE key to set the PSU output voltage. Manually adjust between gear 0 (lowest) and gear 31 (highest) using UP/DOWN.
Depth-mode display fields:
| Display string | Meaning |
|---|---|
| "Vendor: GP-" | PSU manufacturer code — GP = Gaosbao, AR = Anrui, QB = Qianben (Innosilicon's three OEM PSU vendors) |
| "Ver:14.66-" | PSU firmware version (here 14.66) — useful for fleet-wide firmware-update planning |
| "DP Vset= 1535-7" | Setpoint voltage 15.35V at gear 7 |
| "DP Vout= 1547-" | Measured output voltage 15.47V (compare to setpoint to detect regulation drift) |
| "DP Iout=195--" | Measured output current 1.95A (no-load reading on bench) |
| "Status: PSU ON--" | Output state — ON = enabled, OFF = disabled |
| "Com Error: 0-" | Communication error count. Non-zero indicates I²C/comm bus instability — control board cannot reliably command this PSU. |
The setpoint vs measured voltage delta is the most diagnostic single field. A unit reading Vset 1535 / Vout 1500 (35mV / 0.23% droop) is healthy. A unit reading Vset 1535 / Vout 1460 (75mV / 0.49% droop at zero load) is marginal — under hashboard load that droop multiplies and trips under-voltage on the boost converters. Beyond 1% droop at zero load is a hard-fail flag.
Hashboard Test — Step-by-Step
Mode 1 — Quick Connection Test (chain check)
Used for go/no-go triage on incoming pulled boards. No fan power required because the chip chain doesn't run hashing tasks in this mode — minimal heat generated.
- Connect the hashboard to the fixture's interface 1 via the appropriate Innosilicon test fixture data cable (typically 14-pin, 60cm).
- Connect a regulated bench DC supply (12V-30V, 30A+ class such as a WANPTEK KPS3030D or equivalent) to the hashboard's power bus with a 6mm alligator clip cable.
- For T1/L1 boards only: power the fixture itself via interface 3 (6-pin fan rail) AND short the spare power jumper at point 4. T2-series and L2-series do not need these steps.
- Power on the bench supply. The fixture runs the chain test automatically.
- Optionally connect USB at point 8 and open a serial terminal at 115200 baud to capture detailed log output to a host PC.
LED display interpretation:
| Display string | Meaning |
|---|---|
| "Chain OK!" | Chain communication established with all chip positions |
| "Chain Break!! E0:N-" | Chain broken — N indicates the position of the first failed chip (counted from the chain start). The fault is at chip N or in the signal trace immediately before it. |
| "Chips: 140-" | Total chip count detected. Compare to spec (T2TZ = 140 / T2TH = 168 / T2TS = 90 / L2 family varies) — discrepancy means a chip dropped out of the chain |
| "Vol Read OK! 454-" | Average chip voltage successfully read — value in millivolts (454 = 0.454V). Compare to chip spec: 400-500mV typical for T2-family ASICs at idle. |
| "TEMP Read OK! 16-" | Average chip temperature successfully read — value in °C (16 = 16°C ambient bench reading on a cold board) |
| "Test PASS!" | Hashboard cleared all chain + voltage + temperature read sanity checks |
A "Chain Break!! E0:N-" reading is the highest-leverage output. The chip-N localisation tells you which chip position to inspect first: visual check for missing/cracked solder joint, multimeter check on the chip's VDD and VSS pins for short to ground, oscilloscope check on the clock-in pin (CK) and reset (RST) lines from the upstream chip. Cross-reference with our T1668B Tin Stencil for Innosilicon T2T hashboard when chip-level rework is needed.
An "OK chain" with low chip count (e.g. "Chips: 138-" instead of expected 140) means two chips are dead at unknown positions in the middle of the chain — chain still communicates because chips re-routed the signal around the dead ones, but the hashing capacity is reduced. Diagnose by clamping a chip-by-chip current probe across the voltage domains until you find the cold ones.
Mode 2 — Full Process Test (Debug Mode)
Used for root-cause analysis on intermittent failures and post-rework verification under realistic hashing load. Requires:
- Fan power connected at interface 5 (or interface 6 if dual-fan configuration)
- Cooling base under the hashboard (1800 RPM class or equivalent forced-air bench cooling)
- USB connected at point 8 to a PC with a serial terminal at 115200 baud open
Entry sequence:
- Connect hashboard + bench DC supply + fan power + cooling base as in Quick Connection mode.
- Open serial terminal at 115200 baud.
- Press and hold the Debug Mode button (point 12).
- Power on the bench supply while keeping button 12 held.
- Release button 12 once the serial terminal prints "----Enter Debug Mode!----".
Five-step debug workflow:
- Enter PowerOn VID value (0-31, default 0). Sets the startup voltage of the hashboard. Lower VID = higher voltage (the relationship is inverted). Practical range is 12V to 16V depending on the value entered. Stay close to the default unless testing voltage tolerance.
- Enter working PLL frequency MHz of Board 0 (120-1400, default 0). Sets the running frequency. Higher values increase hashing power draw and chip stress. For initial verification use the chip's nameplate frequency (typically 800-1200 MHz for T2-family).
- Press Enter to set PLL. The fixture displays current chip voltage and temperature readings, then commands the frequency increase. If the chain fails during this step, the fixture enters Maintenance Mode and sends continuous maintenance instructions to the hashboard without interrupting power — this lets you probe the board with an oscilloscope on a live but stalled chain to locate the failing chip via signal-trace inspection.
- Press Enter to change the VID. The fixture automatically sweeps the output voltage through five steps, allowing you to observe chip voltage behaviour at each VID gear. This is the most diagnostic step for marginal boards: a healthy board tracks VID changes cleanly; a board with a failing chip shows voltage anomalies on the affected domain at one or more VID points.
- Observe results. Final pass/fail verdict, with detailed serial log output captured to the host PC for post-test review.
Required Supporting Equipment
The fixture is the bench's central diagnostic tool, but it doesn't supply hashboard power or cooling on its own. Build a complete Innosilicon repair bench around the fixture with these supporting items:
| Equipment | Role | Typical spec |
|---|---|---|
| Regulated bench DC supply | Powers the hashboard during testing | 12-30V, 30A+ output (e.g. WANPTEK KPS3030D class) |
| Alligator clip power cable | Connects bench supply to hashboard power bus | 6mm cross-section, low-resistance copper |
| Hash board cooling base | Dissipates heat during Full Process Test | 1800 RPM forced-air bench base |
| Innosilicon test fixture data cable | Connects fixture to hashboard interface | 14-pin / 2×7-pin, 60cm |
| Bench multimeter | Chip-level voltage probing when fixture flags a chain break | Fluke 17B+ or equivalent CAT III |
| Tin-rework stencil for chip replacement | Reflow tooling when failed chip identified | T1668B Tin Stencil for T2T hashboard |
Compatibility — Full Model List
The fixture covers Innosilicon and Aladdin models across both Bitcoin (SHA-256) and Litecoin/Scrypt families:
- Innosilicon Bitcoin SHA-256: T1, T2TS, T2TH, T2TZ, T3
- Innosilicon other algorithms: A4+ (Scrypt), A6, A6+ (CryptoNight family), A9 (Equihash family)
- Aladdin Litecoin/Scrypt: L1, L2HF, L2HU, L2SU, L2HL
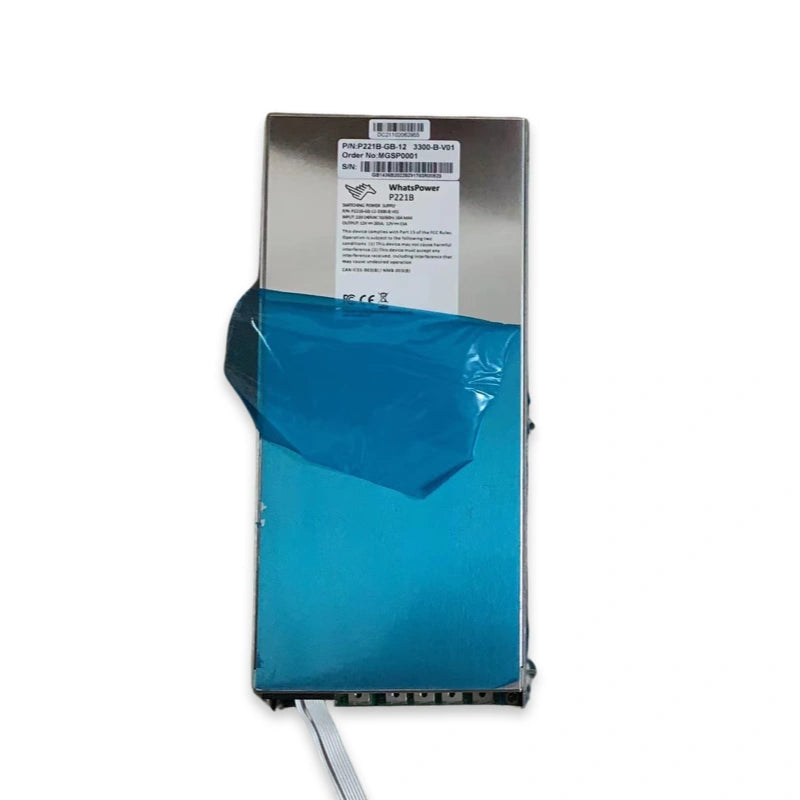
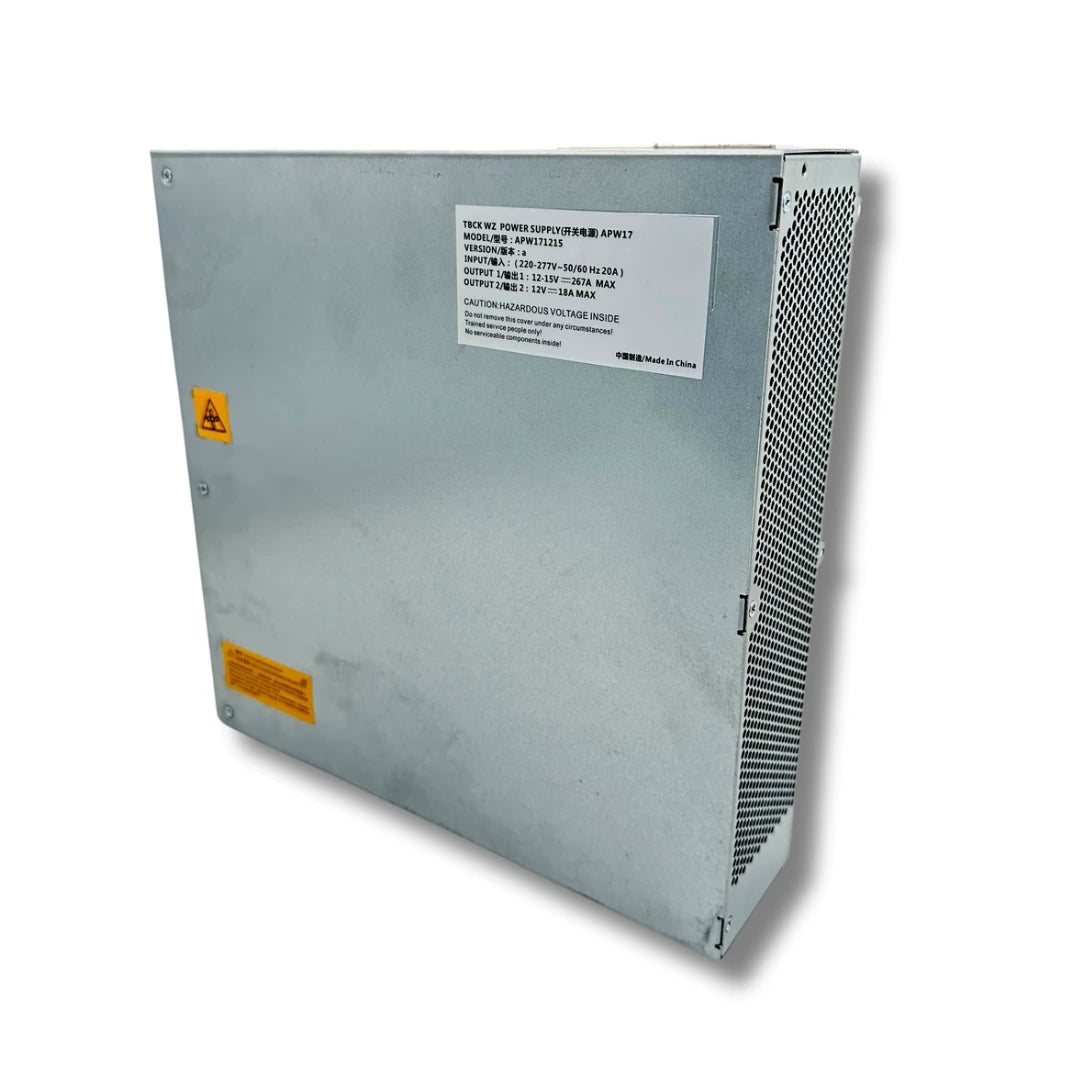
- Digital PSU: all Innosilicon digital PSU series — including the G1240, G1266, G1286, G1306 family (used across T2T, T2Tz, T2Th, T2Th+, T3, T3H, plus Hummer Mars H7)
For Innosilicon A11 / A11 Pro (Ethash, end-of-life now post-Merge) — those use a different chip family and protocol; contact us if you need diagnostic tooling for A11-family boards. For T1-only deployments at scale, the single-model Innosilicon Aladdin T1 Test Fixture (A15 V1.0) is a lower-cost alternative. The T2T/T3/L2 fixture covered in this guide remains the bench-grade option for shops running the full T-series + L-series catalogue.
When the Fixture Earns Its Bench Space
| Scenario | Fixture's value |
|---|---|
| Incoming-board triage (5+ boards/day) | Cuts go/no-go decision time from ~20 minutes (full miner reassembly) to ~2 minutes (chain check) |
| PSU bench validation before customer return | Confirms output voltage + communication + protection trip thresholds without exposing a customer's hashboard to a marginal unit |
| Post-repair verification | Full Process Test loads the board with realistic hashing at controlled VID + PLL — catches marginal repairs that pass the Quick test but fail under thermal stress |
| Chip-level fault localisation | "Chain Break!! E0:N-" output points to the exact failed chip position, eliminating chip-by-chip multimeter sweeping |
| Fleet firmware audit | PSU Depth Test reads firmware version per unit — supports fleet-wide consistency tracking |
| Single Innosilicon model in low volume (<1 board/week) | Marginal economic case — for low-volume Innosilicon work, the universal-kit option is more cost-effective |
Diagnostic decision tree
- Quick PSU test: "DP NG!" + "DP OUT= 0-" → Comm processor failed or main rail dead. Open the PSU per the G1286 PSU Repair Guide or G1240 PSU Repair Guide. Probable failure: PIC supervisor, primary MOSFET, or PFC bulk-cap aged out.
- Quick PSU test: "DP OK!" + "DP OUT= 0-" → Comm alive, main rail not lifting. Probable failure: LLC PWM controller, primary MOSFET, or output sync rectification MOSFET dead.
- Quick PSU test: "DP OK!" + voltage in range → Proceed to Depth Test for tolerance check, then return to service.
- Quick hashboard test: "Chain Break!! E0:N-" → Chip N is the first failure. Visual + multimeter on chip N, escalate to BGA rework if voltage/clock pins read normal but the chain still drops at this position.
- Quick hashboard test: chip count low → Multiple dead chips distributed in the chain. Run Full Process Test with VID sweep to localise voltage-domain weakness.
- Quick hashboard test: "Test PASS!" but field hashrate low → Pass at idle, fails under hashing thermal load. Run Full Process Test with PLL at nameplate frequency + fan cooling and observe whether chain holds.
Bench Workflow Tips from Repair Operators
- Always start with PSU Quick Test before hashboard test — if the PSU is bad, hashboard symptoms can be misleading. PSU goes first in 100% of bench triage.
- Capture the USB serial log for every Full Process Test. The serial output contains chip-by-chip timing data not visible on the LED display — invaluable for after-the-fact analysis when intermittent failures recur.
- Cool the hashboard adequately before Full Process Test. A board that's been on the bench for 30 minutes in summer ambient + no airflow already runs hot; running Debug Mode without cooling base + fans will cascade-burn chips. Always seat the board on the 1800-RPM cooling base before pressing Enter on PLL change.
- Stay close to nameplate frequencies during diagnostic testing. Overclocking via PLL during a fault-finding session adds variables — finalise hardware repair first, then perform overclocking validation as a separate exercise.
- Re-test after every repair step. Single-step diagnostic discipline catches mistakes early. Replacing five chips at once then re-testing is a recipe for losing the trail.
FAQ
How does this fixture differ from a multi-brand tester like K8pro?
The Innosilicon Aladdin fixture is purpose-built for the Innosilicon/Aladdin protocol family — chip-chain communication, digital PSU comm bus, fan drive signalling. Multi-brand tools like the K8pro trade off Innosilicon-specific depth for broader Antminer/Whatsminer coverage. For a shop running primarily Innosilicon/Aladdin work, this fixture's PSU Depth Mode + chip-position-N localisation deliver more diagnostic resolution per board. For mixed-brand benches, K8pro is the single-tool answer with Innosilicon-tier diagnostics for the Antminer/Whatsminer side.
Can I use this fixture on Innosilicon A11 / A11 Pro hashboards?
No. The A11 / A11 Pro use a different chip family (ETHash-specific) and different chain protocol from the T- and L- series this fixture supports. A11 family is end-of-life since Ethereum's Merge to Proof-of-Stake — replacement chips and dedicated diagnostic fixtures are stockpile-only. Contact us if you need sourcing on A11-family tooling.
What's the difference between the Quick Connection Test and Full Process Test?
Quick Connection runs only the chain enumeration + chip count + idle voltage/temperature read — no real hashing tasks, minimal heat, no fan needed. Roughly 30-60 seconds per board. Full Process Test loads the chip chain with controlled-frequency hashing tasks, sweeps the VID gear, and observes per-chip voltage response under real thermal stress. Roughly 5-15 minutes per board with proper cooling. Use Quick for go/no-go triage, use Full Process for root-cause analysis or post-repair validation.
How do I read the "DP OUT" voltage value?
The "DP OUT=" value is in centivolts × 100. "DP OUT= 1565-" means 15.65V output. "DP OUT= 1200-" means 12.00V. "DP OUT= 0-" means no measurable output. Innosilicon digital PSUs in the G-series typically operate in the 12V-16V output range, so a healthy unit shows DP OUT in the 1200-1600 range under no-load bench test conditions.
What does the "Com Error" count tell me in Depth Mode?
"Com Error: 0-" is the I²C/SMBus communication error counter between the fixture (simulating the miner control board) and the PSU's internal supervisor. Zero = clean comm bus, healthy unit. Non-zero = bus instability — PSU's PIC/MCU is failing comm handshakes intermittently. Under field conditions this manifests as the miner control board sporadically losing PSU control, sometimes resetting hashboards or sweeping voltage incorrectly. A non-zero Com Error count is a hard-flag indicator that the PSU's supervisor side needs repair before redeployment.
The fixture shows "Chain OK!" but the chip count is below nameplate — what's the next step?
Healthy chain + low chip count means one or more chips have failed in the middle of the chain, and the remaining chips routed signal around them. The chain communicates, but hashing capacity is reduced. Diagnose by either (a) running Full Process Test with VID sweep and watching for voltage anomalies on specific domains, or (b) chip-by-chip thermal imaging — failed chips run cold while their neighbours run normal-warm. Once the failed positions are identified, BGA rework with the T1668B Tin Stencil restores full chain count.
Related Reading & Tools
- Innosilicon G1286 Power Supply Unit Repair Guide
- Innosilicon G1240 Power Supply Unit Repair Guide
- F1 Crypto Miner Fan Speed Tester User Manual (sister bench-diagnostic article)
- Innosilicon Aladdin T2T / T3 / L2 Test Fixture (this product)
- Innosilicon Aladdin T1 Test Fixture (A15 V1.0)
- T1668B Tin Stencil for Innosilicon T2T Hashboard
- K8pro ASIC Multi-Brand Hashboard / PSU Tester
- Innosilicon A4+ Control Board PCBA
Order the Right Innosilicon Test Fixture for Your Bench
For a Innosilicon-focused repair bench running T-series, A-series and L-series boards in regular volume, the T2T/T3/L2 fixture is the single tool that anchors the workflow — PSU quick check on incoming units, hashboard chain triage, Full Process Test for repair verification. Stock includes the fixture itself, the supporting data cable, and the universal kit for shops needing broader coverage.
For volume bench-tool orders (fixtures + cables + cooling bases + tin stencils as a kit), bulk pricing on Innosilicon repair benches, or sourcing on legacy fixture variants for older T1/A4+ deployments, contact us at contact@lys-sz.com. We ship Innosilicon repair tooling worldwide from our Shenzhen warehouse, with DDP shipping available as the primary option for US and EU destinations.